The reed I'm going to make is made in one piece from a length of Arundo Donax - otherwise known as reed-cane. The stuff that's used for such things as saxophone and clarinet reeds as well as traditional bagpipe reeds. In fact I used to use tenor drone reeds from Highland bagpipes, shortened and with the tongue shaved thin. Some of them worked brilliantly, but others weren't so good. Then I got a box full of reed cane from a guy in Sardinia...
The first job is to select a piece with a nice round cross section so that it will fit into the pibgorn reed socket nicely. I'll be wrapping the open end of the reed with thread to make an airtight seal later on so it wants to be a loose fit in the pibgorn. Next the excess reed is cut off close above the leaf node using a junior hacksaw and taking care not to split bits off the reed. The node itself forms an air tight seal at the top end of the finished reed. Trim off any bits of leaf there.
Next, the reed needs to be cut to length. I measure it against an old reed to get the length right, then saw it through with the junior hacksaw - cutting in first from one side, then from the other. This minimises the risk of splitting bits of cane off which would ruin the reed. I trim round the open end with a knife then make sure there's nothing up inside the reed by slipping a twist drill bit that's a loose fit up inside it.
Then I use some fine sandpaper to roughen up the surface of the last 15mm or so at the open end. I'm going to wrap thread on this, so first I apply a bit of glue to further give the thread something to grip to. Then whip thread on until the reed makes an easy push fit into the reed socket of the pibgorn.
The picture above shows the pibgorn with the reed as it is at this stage. The next job to do is to cut the tongue out of the body of the reed. Make a sloping cut just below the node at the sealed end of the reed.
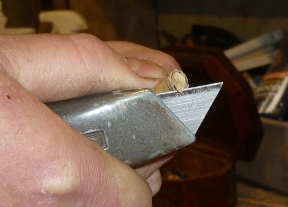
Then another in the opposite direction to make a notch out of the reed. Then make the first cut a bit deeper. Your knife needs to be really sharp so if you're using one that uses disposable blades, then fit a new blade before you start.
After this you're going to split down the sides of the reed to form the tongue. Start up near where you've just cut across the reed. You start the cut and by gently twisting the blade, force the reed to split along it's grain. If you were to actually cut down the length, it wouldn't be possible to get a clean split and the reed would be unlikely to work. Split both sides, right down to the thread binding at the open end of the reed.
I find the reeds work best if you then shave the tongue so that it ends up about 1mm or a bit less thick.
When the tongue is about the right thickness you need to tie on a bridle. For this I again use thread, but it's not stuck in place so you can slide it up or down the reed to vary the length of the tongue.
At this stage the tongue will be clamped shut against the reed body, but to work it needs to be open at the tip near the node. Round about 1mm should work. You could of course simply bend the tongue up and it would work but the tongue would all the while be trying to return to it's natural state so the instrument would not stay in tune at all. To prise the tongue up I insert a length of hair from a horses tail under the tongue up near the bridle. This locks the tongue in the open position.
The reed should now look like the pictures below:
It's now time to see if it works at all. The picture below shows me testing the reed against an electronic tuner. I've put the open end in my mouth and am sucking hard on it to make it sound. From experience I know that to work in the pibgorn it needs to sound about F# above the top D of the pibgorn. This one was more like G# so I adjusted it to bring it down to F#.
I did this by moving the bridle a little down towards the open end and also moved the hair down a bit too. This didn't flatten it enough so I gently scraped the reed thinner above the hair. Generally, scraping it here flattens the reed, whereas if you made the tip thinner it would sharpen it. Shaving the whole tongue evenly along it's length makes it easier to play, but shouldn't alter it's pitch. It was now time to try it in the pibgorn.
I found the pibgorn played well and without too much pressure but it generally played way too sharp over it's whole scale. To lower it, I pulled the reed up in it's socket and when this didn't lower it enough I flatten it by applying a blob of melted wax to the tip of the tongue using a bradawl heated in a candle flame. The wax I applied was from a beeswax candle - beeswax is quite sticky and stays stuck where you put it.
At this point it's best to leave it until the next day before continuing. Making the reed entails quite a lot of messing with the tongue and it needs to settle down before you continue otherwise you could have the pibgorn playing nicely and in tune and the next day it might not even play at all, or be way out of tune.
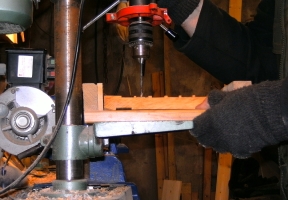
So the next day I returned to it and when I tried it I found it played well and pretty much in tune. A few of the notes - E, F#, G and B - played flat but not too much so I slightly enlarged the holes using the pillar drill until they were in tune. If a note had been too sharp, but the rest ok, I could have flattened it by running a little melted beeswax round the bore of the hole with the bradawl. It's quite normal with a much played instrument to see quantities of wax in the holes!
So that's it. This reed was actually quite easy to make and get working. Sometimes it can take ages of messing about to get a reed working and sometimes you have to bin it and start again with a new piece of cane. One of the joys of pibgorn ownership!
Below is a Youtube video of the finished instrument:
This instrument is currently for sale at £165 plus postage. SOLD.


