
Starting point is a blank cut from some seasoned yew. This is a little bigger than the finished instrument. Using a twist drill bit (8mm) on the lathe I drill in from both ends so that it meets perfectly in the centre of the blank. This will be the bore of the finished instrument but at this stage it also helps prevent cracking during final seasoning. The ends are sealed by dipping them in melted wax before the blank is hung up inside my home so that it's moisture content can reduce to that inside the house. This takes about a month and is very important for producing a stable instrument.
After final seasoning the blank is mounted on the lathe and the ends squared off to the finished size. Then using a parting tool, tenons are turned on each end that will fit inside sockets drilled in the bell and mouth horns. If I was making a `round' pibgorn I would have rounded off the blank before making the tenons as otherwise there is a danger of the tenons cracking under the strain.

The body is now shaped. I do it freehand using a grinding disc mounted on the lathe headstock. Although I'm using a machine to do the shaping, the finished shape is much more hand-made.

Instead of being perfectly flat, I make mine so that the centre of the body is thinner than the two ends. The grinding leaves quite a lot of scratching on the surface so I finish it off by hand sanding it smooth. At this stage I then bind the tenons with polyester sewing thread so that they will be a perfect fit in the horns.

At this point I make the depressions in which the finger and thumb holes will sit. I have a jig I use for marking the hole positions so I use this to help me get the depressions in the right place. After marking them out, I cut along their edges using a junior hacksaw to the required depth, then trim away as much wood as I can with a Stanley knife before removing the rest with a file.


The body at this stage when all the depressions have been filed out is as shown below. After this, I like to oil the piece by soaking it in a mixture of boiled linseed oil and real turpentine which I've previously heated to about 100 degrees c. The heat causes the air in the wood fibres to expand and bubble out and as the oil cools it is sucked back into the wood. This helps to moisture proof the finished instrument so it remains stable during playing.

Afterwards the pibgorn body is hung up to let the oil drain off it before wiping it dry, including down the bore, and then hanging it back up in the house for the oil to dry. This takes a few weeks. Basically as the more volatile oils evaporate, the rest turns into a kind of water-repellant jelly inside the fibres of the wood.

While it's drying I make the horns. After selecting a suitable one for the bell-horn, I cut off the tip at the point where the internal cavity ends, after first measuring this by poking a wire down inside. Then I drill a pilot hole in the sawn-off end, hand holding the horn against a drill mounted on the lathe. I don't recomend this as it's a good way to lose some fingers!

The socket is then drilled, in the same manner but using a flat bit modified so that it follows the pilot hole and uses the pilot hole to centre it and stop it wandering. After this I clamp it upright as best I can and saw out the open `jaw' shape characteristic of Welsh hornpipes.

The horn is then ground thinner using the grinding wheel on the lathe again and finishing off with a fine sanding disc. Horns vary in their wall thickness but they need to be quite thin to give the best sound. I personally don't like them too thin as it leaves them prone to easy breakage, but if they are too thick the balance of the finished instrument will be all wrong.

Needless to say - don't breathe any of this stuff in! The mouth-horn is similarly made. It's a bit easier than the bell-horn as there's no jaw shape to cut out, but you also have the problem of making the open end round when the horns come in every shape but. When they're both finished they need to be soaked in a tub of water for a few weeks to soften them. After this they're taken out and finished by scraping and the bell-horn has serrations cut into the open end with a Stanley knife.

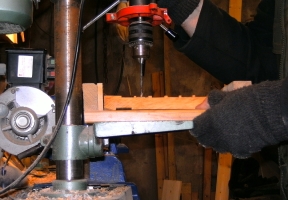
While they horns are still in soak, I drill the fingerholes when the oil has dried. Again I use the jog to mark their positions and drill them using twist drill bits in a pillar drill. This innevitably causes splinters in the bore which I remove using a metal skewer heated to red heat with a blowtorch, which with care I can use to burn the splinters without damaging the bore. Crude but effective.

After this I drill the reed socket in the upper end of the pibgorn, polish the horns using beeswax polish, and that's the easy bit finished. The hard bit of course is getting it to work! And play in tune! This involves making a reed and by tiny adjustments getting it to play more or less properly before adjusting the fingerholes to bring them in to tune. I'll deal with that in another post.

I'd be interested in owning one of these, as I've playing bagpipes and hurdy gurdy lately, but I'm not much of a craftsman. Do you think you'd be willing to make and ship one to the United States, particularly to Ohio? What's your current price?
ReplyDelete